By: W09-B4 Since: Jun 2016 Licence: MIT
- 1. Setting up
- 2. Design
- 3. Implementation
- 4. Documentation
- 5. Testing
- 6. Dev Ops
- Appendix A: Product Scope
- Appendix B: Product Scope
- Appendix C: Feature Contribution
- Appendix D: User Stories
- Appendix E: Use Cases
- Appendix F: Non Functional Requirements
- Appendix G: Glossary
- Appendix H: Instructions for Manual Testing
1. Setting up
1.1. Prerequisites
-
JDK
1.8.0_60or laterHaving any Java 8 version is not enough.
This app will not work with earlier versions of Java 8. -
IntelliJ IDE
IntelliJ by default has Gradle and JavaFx plugins installed.
Do not disable them. If you have disabled them, go toFile>Settings>Pluginsto re-enable them.
1.2. Setting up the project in your computer
-
Fork this repo, and clone the fork to your computer
-
Open IntelliJ (if you are not in the welcome screen, click
File>Close Projectto close the existing project dialog first) -
Set up the correct JDK version for Gradle
-
Click
Configure>Project Defaults>Project Structure -
Click
New…and find the directory of the JDK
-
-
Click
Import Project -
Locate the
build.gradlefile and select it. ClickOK -
Click
Open as Project -
Click
OKto accept the default settings -
Open a console and run the command
gradlew processResources(Mac/Linux:./gradlew processResources). It should finish with theBUILD SUCCESSFULmessage.
This will generate all resources required by the application and tests.
1.3. Verifying the setup
-
Run the
seedu.flashy.MainAppand try a few commands -
Run the tests to ensure they all pass.
1.4. Configurations to do before writing code
1.4.1. Configuring the coding style
This project follows oss-generic coding standards. IntelliJ’s default style is mostly compliant with ours but it uses a different import order from ours. To rectify,
-
Go to
File>Settings…(Windows/Linux), orIntelliJ IDEA>Preferences…(macOS) -
Select
Editor>Code Style>Java -
Click on the
Importstab to set the order-
For
Class count to use import with '*'andNames count to use static import with '*': Set to999to prevent IntelliJ from contracting the import statements -
For
Import Layout: The order isimport static all other imports,import java.*,import javax.*,import org.*,import com.*,import all other imports. Add a<blank line>between eachimport
-
Optionally, you can follow the UsingCheckstyle.adoc document to configure Intellij to check style-compliance as you write code.
1.4.2. Updating documentation to match your fork
After forking the repo, links in the documentation will still point to the se-edu/addressbook-level4 repo. If you plan to develop this as a separate product (i.e. instead of contributing to the se-edu/addressbook-level4) , you should replace the URL in the variable repoURL in DeveloperGuide.adoc and UserGuide.adoc with the URL of your fork.
1.4.3. Setting up CI
Set up Travis to perform Continuous Integration (CI) for your fork. See UsingTravis.adoc to learn how to set it up.
After setting up Travis, you can optionally set up coverage reporting for your team fork (see UsingCoveralls.adoc).
| Coverage reporting could be useful for a team repository that hosts the final version but it is not that useful for your personal fork. |
Optionally, you can set up AppVeyor as a second CI (see UsingAppVeyor.adoc).
| Having both Travis and AppVeyor ensures your App works on both Unix-based platforms and Windows-based platforms (Travis is Unix-based and AppVeyor is Windows-based) |
1.4.4. Getting started with coding
When you are ready to start coding,
-
Get some sense of the overall design by reading Section 2.1.
-
Take a look at [GetStartedProgramming].
2. Design
2.1. Architecture

The Architecture Diagram given above explains the high-level design of the App. Given below is a quick overview of each component.
The .pptx files used to create diagrams in this document can be found in the diagrams folder. To update a diagram, modify the diagram in the pptx file, select the objects of the diagram, and choose Save as picture.
|
Main has only one class called MainApp. It is responsible for,
-
At app launch: Initializes the components in the correct sequence, and connects them up with each other.
-
At shut down: Shuts down the components and invokes cleanup method where necessary.
Commons represents a collection of classes used by multiple other components. Two of those classes play important roles at the architecture level.
-
EventsCenter: This class (written using Google’s Event Bus library) is used by components to communicate with other components using events (i.e. a form of Event Driven design) -
LogsCenter: Used by many classes to write log messages to the App’s log file.
The rest of the App consists of four components.
Each of the four components
-
Defines its API in an
interfacewith the same name as the Component. -
Exposes its functionality using a
{Component Name}Managerclass.
For example, the Logic component (see the class diagram given below) defines it’s API in the Logic.java interface and exposes its functionality using the LogicManager.java class.

Events-Driven nature of the design
The Sequence Diagram below shows how the components interact for the scenario where the user issues the command delete 1.
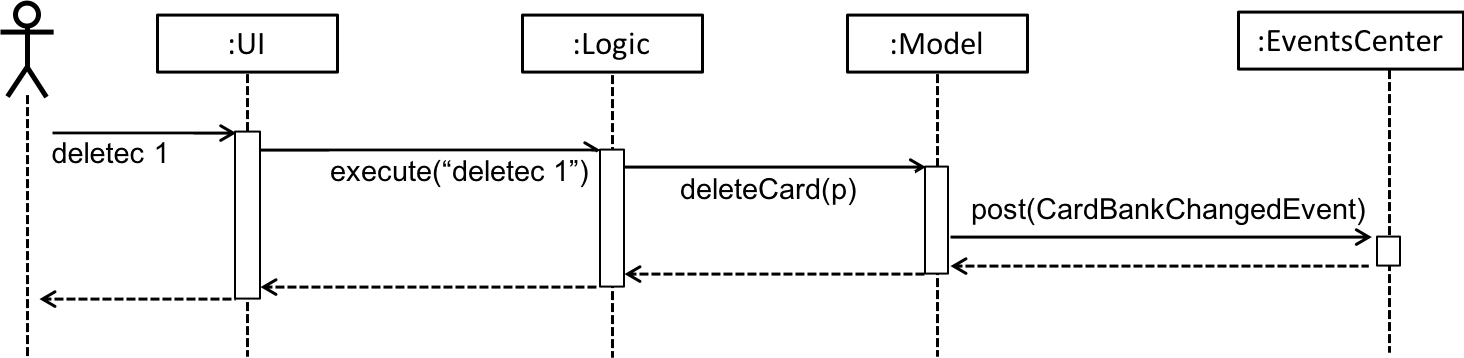
deletec 1 command (part 1)
Note how the Model simply raises a CardBankChangedEvent when the Card Bank data are changed, instead of asking the Storage to save the updates to the hard disk.
|
The diagram below shows how the EventsCenter reacts to that event, which eventually results in the updates being saved to the hard disk and the status bar of the UI being updated to reflect the 'Last Updated' time.
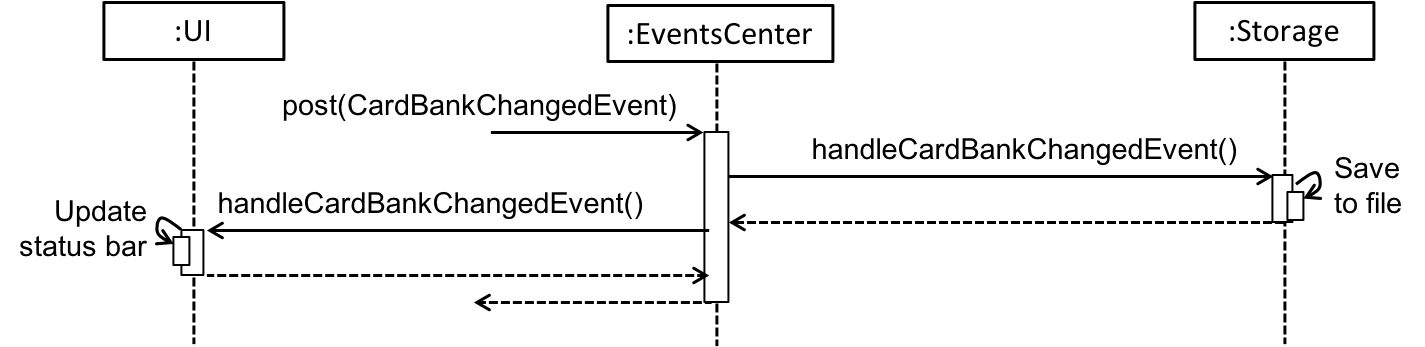
delete 1 command (part 2)
Note how the event is propagated through the EventsCenter to the Storage and UI without Model having to be coupled to either of them. This is an example of how this Event Driven approach helps us reduce direct coupling between components.
|
The sections below give more details of each component.
2.2. UI component

API : Ui.java
The UI consists of a MainWindow that is made up of parts e.g.CommandBox, ResultDisplay, PersonListPanel, StatusBarFooter, BrowserPanel etc. All these, including the MainWindow, inherit from the abstract UiPart class.
The UI component uses JavaFx UI framework. The layout of these UI parts are defined in matching .fxml files that are in the src/main/resources/view folder. For example, the layout of the MainWindow is specified in MainWindow.fxml
The UI component,
-
Executes user commands using the
Logiccomponent. -
Binds itself to some data in the
Modelso that the UI can auto-update when data in theModelchange. -
Responds to events raised from various parts of the App and updates the UI accordingly.
2.3. Logic component

XYZCommand and Command in Figure 6API :
Logic.java
-
Logicuses theCardBankParserclass to parse the user command. -
This results in a
Commandobject which is executed by theLogicManager. -
The command execution can affect the
Model(e.g. adding a person) and/or raise events. -
The result of the command execution is encapsulated as a
CommandResultobject which is passed back to theUi.
Given below is the Sequence Diagram for interactions within the Logic component for the execute("deletec 1") API call.

delete 1 Command2.4. Model component

API : Model.java
The Model,
-
stores a
UserPrefobject that represents the user’s preferences. -
stores the flashcard data.
-
exposes an unmodifiable
ObservableList<Card>that can be 'observed' e.g. the UI can be bound to this list so that the UI automatically updates when the data in the list change. -
does not depend on any of the other three components.
2.5. Storage component

API : Storage.java
The Storage component,
-
can save
UserPrefobjects in json format and read it back. -
can save the flashcard data in xml format and read it back.
2.6. Common classes
Classes used by multiple components are in the seedu.flashy.commons package.
3. Implementation
This section describes some noteworthy details on how certain features are implemented.
3.1. Undo/Redo feature
3.1.1. Current Implementation
The undo/redo mechanism is facilitated by an UndoRedoStack, which resides inside LogicManager. It supports undoing and redoing of commands that modifies the state of the application (e.g. addc, editc). Such commands will inherit from UndoableCommand.
UndoRedoStack only deals with UndoableCommands. Commands that cannot be undone will inherit from Command instead. The following diagram shows the inheritance diagram for commands:
As you can see from the diagram, UndoableCommand adds an extra layer between the abstract Command class and concrete commands that can be undone, such as the DeleteCommand. Note that extra tasks need to be done when executing a command in an undoable way, such as saving the state of the application before execution. UndoableCommand contains the high-level algorithm for those extra tasks while the child classes implements the details of how to execute the specific command. Note that this technique of putting the high-level algorithm in the parent class and lower-level steps of the algorithm in child classes is also known as the template pattern.
Commands that are not undoable are implemented this way:
public class ListCommand extends Command {
    @Override
    public CommandResult execute() {
        // ... list logic ...
    }
}
With the extra layer, the commands that are undoable are implemented this way:
public abstract class UndoableCommand extends Command {
    @Override
    public CommandResult execute() {
        // ... undo logic ...

        executeUndoableCommand();
    }
}

public class DeleteCommand extends UndoableCommand {
    @Override
    public CommandResult executeUndoableCommand() {
        // ... delete logic ...
    }
}
Suppose that the user has just launched the application. The UndoRedoStack will be empty at the beginning.
The user executes a new UndoableCommand, deletec 5, to delete the 5th person in the application. The current state of the application is saved before the deletec 5 command executes. The deletec 5 command will then be pushed onto the undoStack (the current state is saved together with the command).

As the user continues to use the program, more commands are added into the undoStack. For example, the user may execute addc f/What is … to add a new card.
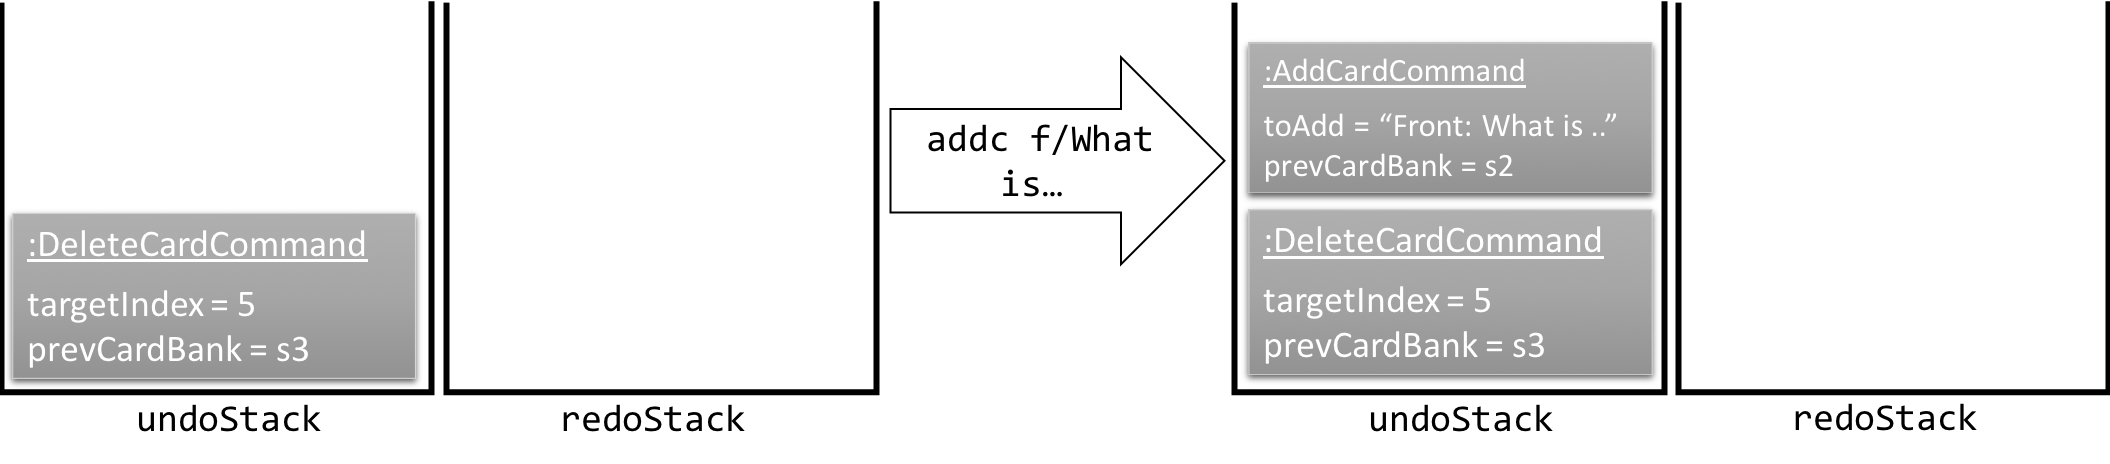
If a command fails its execution, it will not be pushed to the UndoRedoStack at all.
|
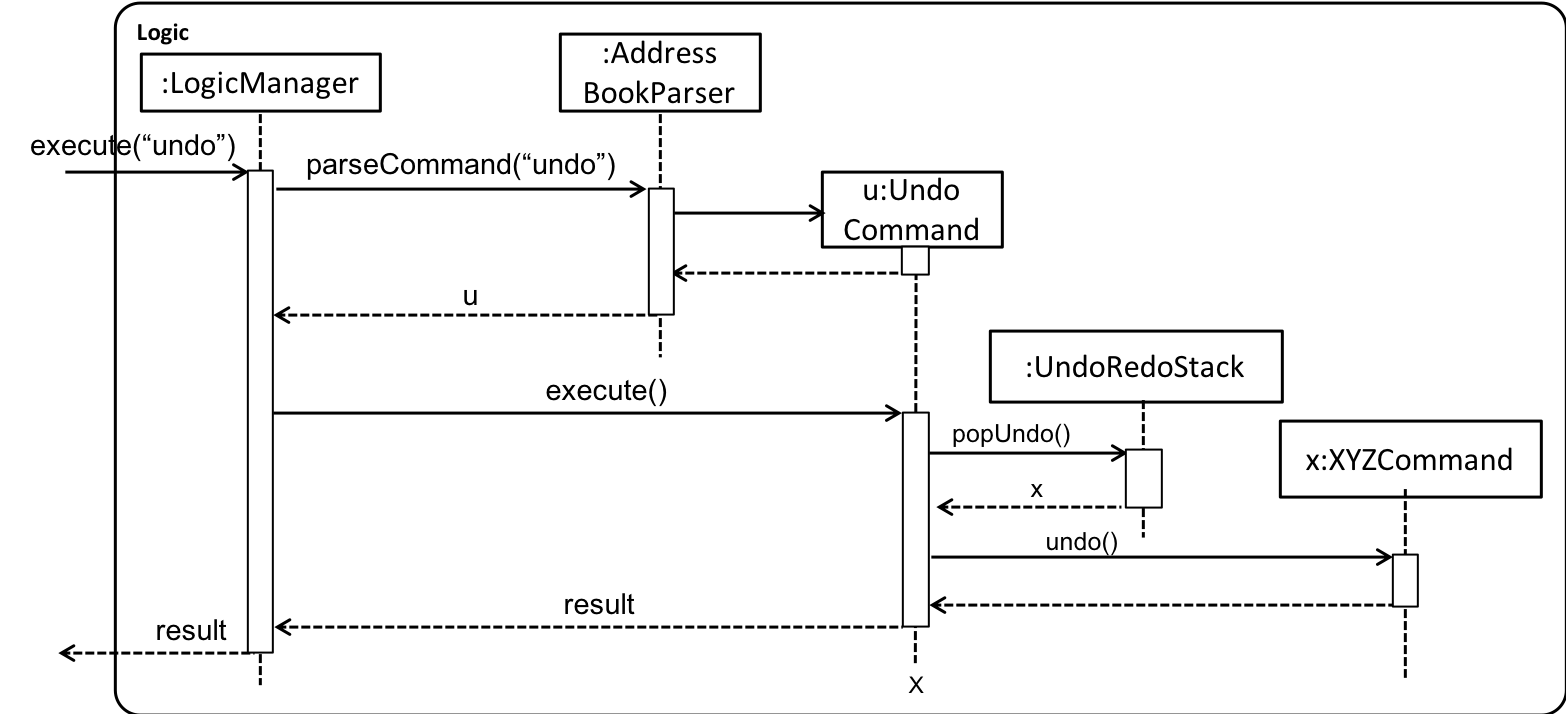
The user now decides that adding the card was a mistake, and decides to undo that action using undo.
We will pop the most recent command out of the undoStack and push it back to the redoStack. We will restore the application to the state before the addc command executed.
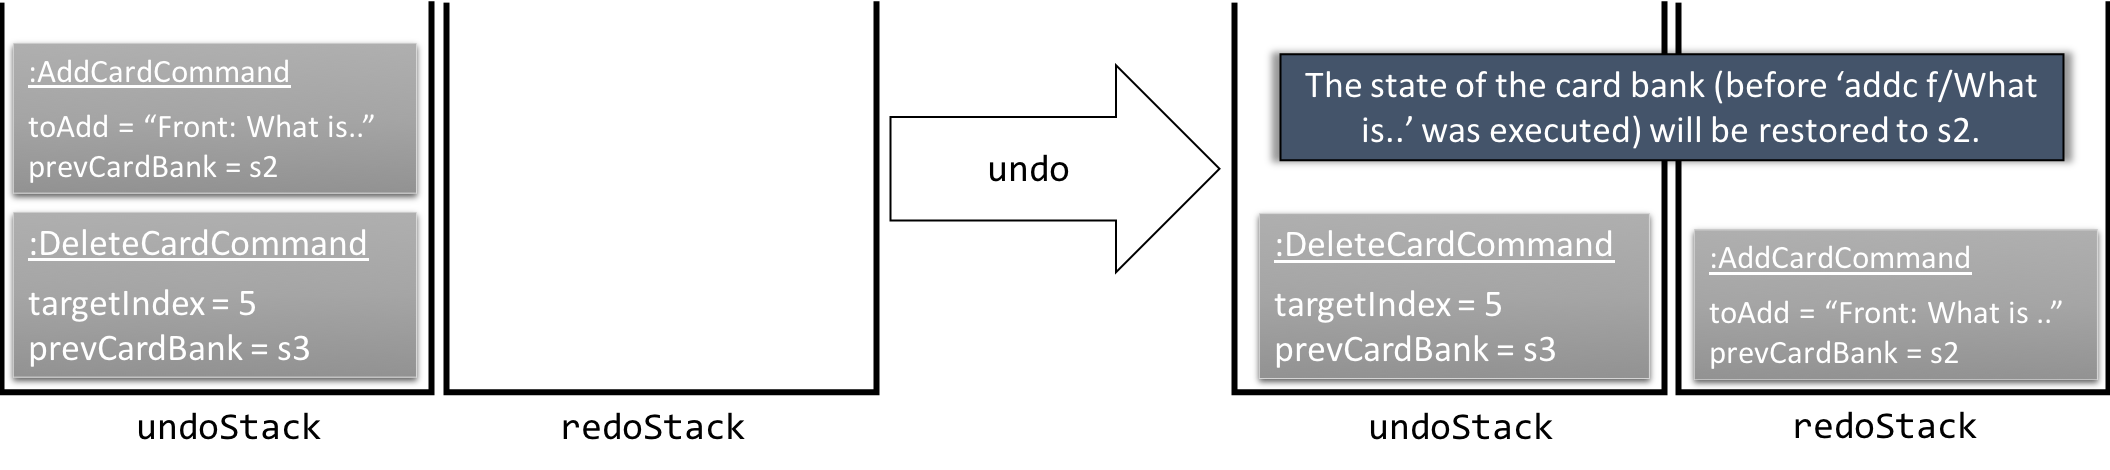
If the undoStack is empty, then there are no other commands left to be undone, and an Exception will be thrown when popping the undoStack.
|
The following sequence diagram shows how the undo operation works:
The redo does the exact opposite (pops from redoStack, push to undoStack, and restores the application to the state after the command is executed).
If the redoStack is empty, then there are no other commands left to be redone, and an Exception will be thrown when popping the redoStack.
|
The user now decides to execute a new command, clear. As before, clear will be pushed into the undoStack. This time the redoStack is no longer empty. It will be purged as it no longer make sense to redo the add n/David command (this is the behavior that most modern desktop applications follow).

Commands that are not undoable are not added into the undoStack. For example, list, which inherits from Command rather than UndoableCommand, will not be added after execution:

The following activity diagram summarize what happens inside the UndoRedoStack when a user executes a new command:

3.1.2. Design Considerations
Aspect: Implementation of UndoableCommand
-
Alternative 1 (current choice): Add a new abstract method
executeUndoableCommand()-
Pros: We will not lose any undone/redone functionality as it is now part of the default behaviour. Classes that deal with
Commanddo not have to know thatexecuteUndoableCommand()exist. -
Cons: Hard for new developers to understand the template pattern.
-
-
Alternative 2: Just override
execute()-
Pros: Does not involve the template pattern, easier for new developers to understand.
-
Cons: Classes that inherit from
UndoableCommandmust remember to callsuper.execute(), or lose the ability to undo/redo.
-
Aspect: How undo & redo executes
-
Alternative 1 (current choice): Saves the entire application state.
-
Pros: Easy to implement.
-
Cons: May have performance issues in terms of memory usage.
-
-
Alternative 2: Individual command knows how to undo/redo by itself.
-
Pros: Will use less memory (e.g. for
delete, just save the person being deleted). -
Cons: We must ensure that the implementation of each individual command are correct.
-
Aspect: Type of commands that can be undone/redone
-
Alternative 1 (current choice): Only include commands that modifies data (
add,addc,addmclear,edit,editc,editm).-
Pros: We only revert changes that are hard to change back (the view can easily be re-modified as no data are * lost).
-
Cons: User might think that undo also applies when the list is modified (undoing filtering for example), * only to realize that it does not do that, after executing
undo.
-
-
Alternative 2: Include all commands.
-
Pros: Might be more intuitive for the user.
-
Cons: User have no way of skipping such commands if he or she just want to reset the state of the application and not the view. Additional Info: See our discussion here.
-
Aspect: Data structure to support the undo/redo commands
-
Alternative 1 (current choice): Use separate stack for undo and redo
-
Pros: Easy to understand for new Computer Science student undergraduates to understand, who are likely to be * the new incoming developers of our project.
-
Cons: Logic is duplicated twice. For example, when a new command is executed, we must remember to update * both
HistoryManagerandUndoRedoStack.
-
-
Alternative 2: Use
HistoryManagerfor undo/redo-
Pros: We do not need to maintain a separate stack, and just reuse what is already in the codebase.
-
Cons: Requires dealing with commands that have already been undone: We must remember to skip these commands. Violates Single Responsibility Principle and Separation of Concerns as
HistoryManagernow needs to do two * different things.
-
3.2. Support for multiple themes
To allow the user to personalize their experience with Flashy, we have decided to add support for multiple themes. The architecture of this functionality has been designed to allow for maximum extensibility. Should you wish to add more themes to Flashy, simply duplicate and modify one of the existing CSS files. After that, modify the list of accepted themes in UiManager.java and the theme will be supported. This is the current list of supported themes:
public class UiManager extends ComponentManager implements Ui {
    public static final String[] VALID_THEMES = {"light", "dark"};

    // ...
}
These theme strings map into the following CSS files in ChangeThemeCommand:
public class ChangeThemeCommand extends Command {
    private final String[] themeStrings = {"view/LightTheme.css", "view/DarkTheme.css"};

    // ...
}
3.2.1. Current Implementation
The current implementation uses a single CSS file per designated theme. Flashy will load the selected theme dynamically. Figure 11 illustrates the sequence diagram for the theme changing functionality:
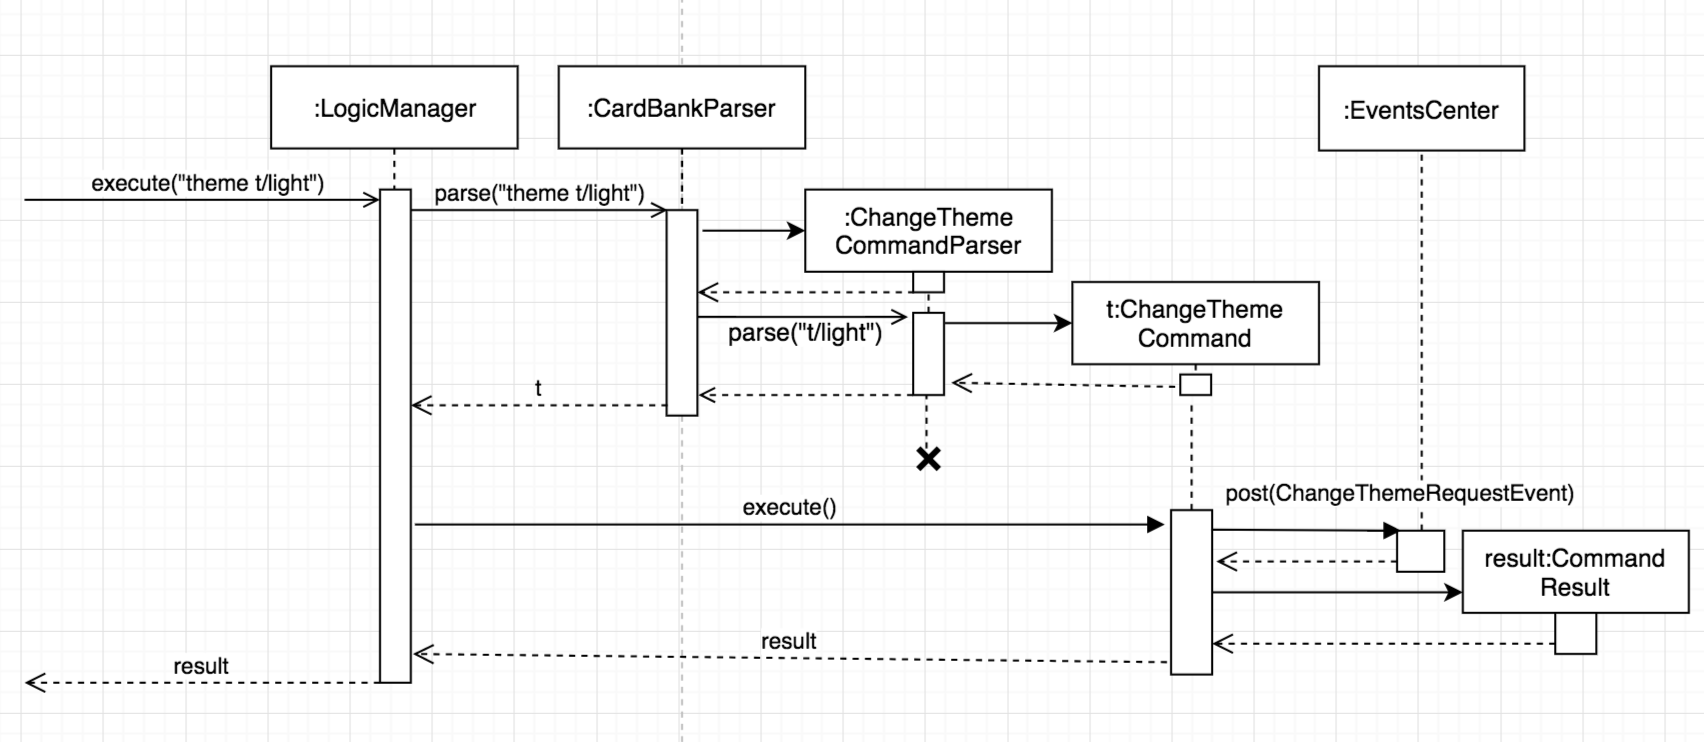
theme3.2.2. Design considerations
Aspect: Supporting dynamically switchable themes
-
Alternative 1: Do not support dynamic switching, ship a separate version for each theme.
-
Pros: Consistent user experience with a single theme.
-
Cons: No ability to customize the look and feel of the application on the fly.
-
-
Alternative 2: Support dynamic switching of themes.
-
Pros: Users get a certain extent of customizability in the application.
-
Cons: More development effort needed to support multiple themes and ensure that they can be loaded.
-
3.3. Autocompletion
We built Flashy with an autocompletion feature to save the user the trouble of memorising the parameters of all the possible commands supported by the application. At present, autocompletion is invoked by pressing the TAB key after entering a valid command.
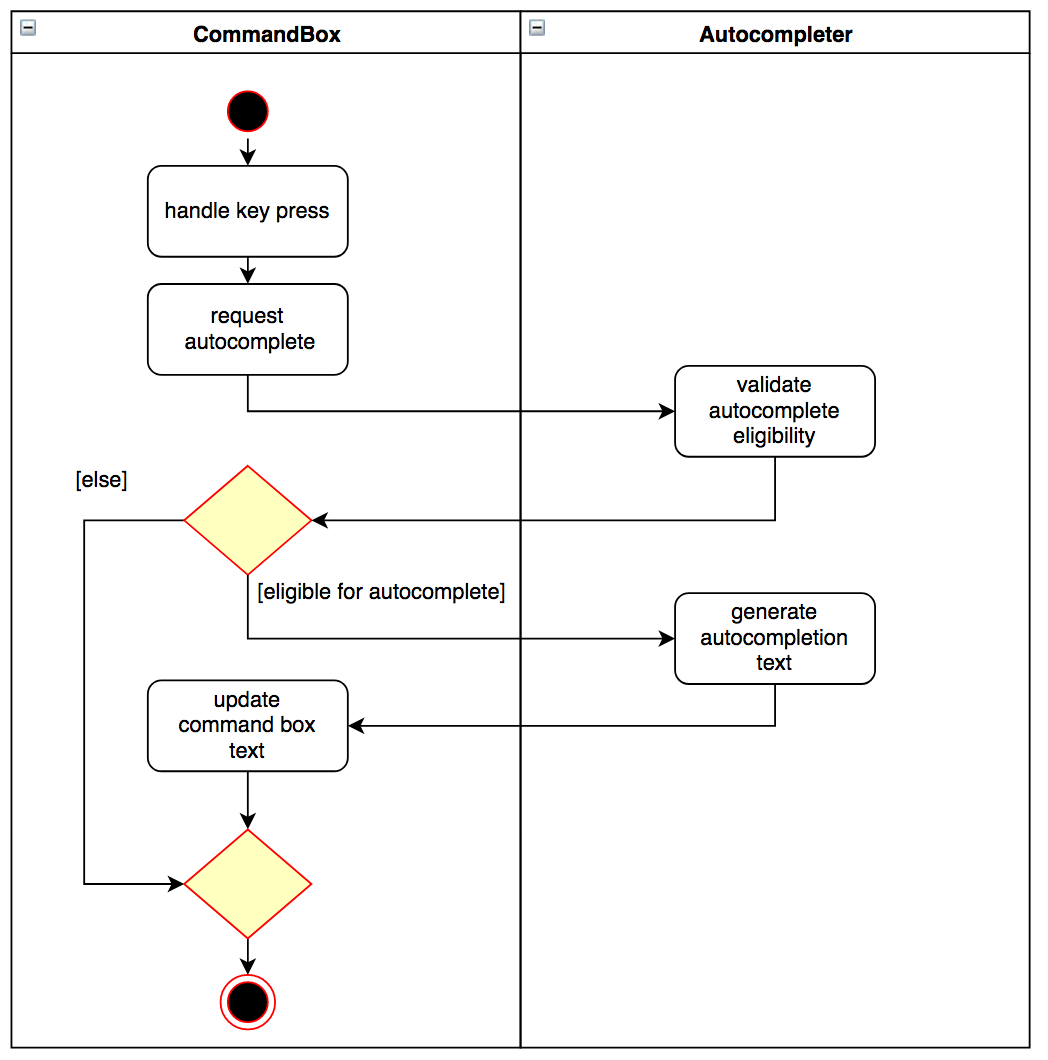
3.3.1. Current Implementation
All autocompletion-related computation is done in the Autocompleter class. It abstracts the logic of validating the eligibility of autocompletion and generating the autocompletion text into two publicly-exposed APIs, as shown in this compressed code segment:
public class Autocompleter {
    public static String getAutocompleteText(String input) {
        // ...
    }

    public static Boolean isValidAutocomplete(String input) {
       // ...
    }
}
The upon pressing TAB, the CommandBox first checks with Autocompleter to see if it is a valid command. If it is valid, it then generates an autocompletion text for CommandBox to be updated with. Figure 12 contains a visual representation of the workflow.
3.3.2. Supporting autocompletion in future commands
Should you develop more commands in the future, you can let your command support autocompletion by following these steps:
-
Declare
COMMAND_WORDandPARAMSin your class.public class NewCommand extends Command { public static final String COMMAND_WORD = "command word here"; public static final String PARAMS = "parameters here"; // ... } -
Include your command’s class in
Autocompleter.private static List<Class<? extends Command>> getCommandClasses() { List<Class<? extends Command>> commands = new ArrayList<>(); // Must be added in increasing specificity so that add is not // overridden by addc, for example. commands.add(NewCommand.class); }
3.3.3. Design Considerations
Aspect: Storage of command and parameters
The commands and parameters used by Autocompleter need to be stored somewhere accessible at runtime so that it can validate and generate autocompletion text.
-
Alternative 1: Hardcode commands and parameters in
Autocompleteritself.-
Pros: This is easy to implement. Simply hardcode the command words and parameters within the
Autocompleterclass. -
Cons: Doing so requires the class to be updated whenever any command words or parameters change.
-
-
Alternative 2 (Current choice): Dynamically poll each command class for their command words and parameters at runtime.
-
Pros: Once this is implemented, there is no longer any need to modify
Autocompleter's code. Any changes made in the command class code is automatically reflected inAutocompleter. -
Cons: This is a little more challenging to implement. It accessing class parameters at runtime with strings require the use of advanced Java features such as the reflection libary.
-
3.4. Logging
We are using java.util.logging package for logging. The LogsCenter class is used to manage the logging levels and logging destinations.
-
The logging level can be controlled using the
logLevelsetting in the configuration file (See Section 3.5) -
The
Loggerfor a class can be obtained usingLogsCenter.getLogger(Class)which will log messages according to the specified logging level -
Currently log messages are output through:
Consoleand to a.logfile.
Logging Levels
-
SEVERE: Critical problem detected which may possibly cause the termination of the application -
WARNING: Can continue, but with caution -
INFO: Information showing the noteworthy actions by the App -
FINE: Details that is not usually noteworthy but may be useful in debugging e.g. print the actual list instead of just its size
3.5. Configuration
Certain properties of the application can be controlled (e.g App name,
logging level) through the configuration file (default:
config.json).
3.6. Card-Tag Association
This section describes the implementation details on how we model the association between flashcards and tags.
The modeling of relations between flashcards and tags is crucial to Flashy, because this is the primary mode of content organization in the application. Henceforth, we will use the term "edge" to refer to a relation between a flashcard and a tag.
3.6.1. Design Requirements
The software requires that:
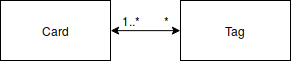
-
A card can be associated with many tags. For example, a card with a Physics question may be added to the "Physics" tag, and the "Midterm 2018" tag.
-
A tag can be associated with 1 or more cards. For example, The "Physics" tag may contain many Physics flashcards on different topics. We enforce that a tag must have at least one card, because a tag without cards is not useful and can be removed.
This relationship is illustrated in Figure 13:
3.6.2. Current Implementation
Edges are stored in an instance of CardTag. CardTag is an
association class, containing two `HashMap`s, as illustrated in Figure 14.
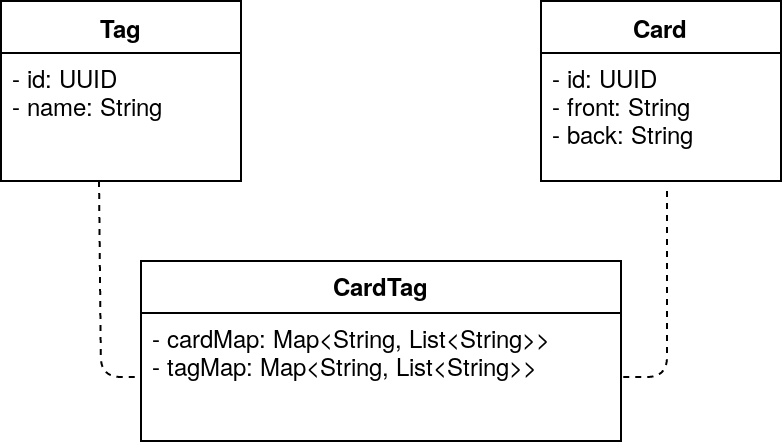
Card, Tag and CardTag
Note that CardTag is only weakly associated to Card and CardTag. In particular, it stores the string representation
of the IDs of Card and Tag objects. This can lead to inconsistent states: for example, it is valid code-wise to have CardTag
to contain IDs of Tag and Card objects that have been deleted. Defensive programming is added to ensure that their states are consistent and valid.
|
Similar to UniqueCardList and UniqueTagList, only one instance of CardTag exists in each
CardBank.
3.6.3. Exposed APIs
Interaction with the CardTag instance is performed through the
Model. The model exposes 3 main methods for creating and removing
new edges:
public interface Model {
    // ...

    /** Gets list of tags for a given card */
    List<Tag> getTags(Card card);

    /** Removes the tags for a card */
    void removeTags(Card card, Set<Tag> tags) throws EdgeNotFoundException, TagNotFoundException;

    /** Adds the tags for a card */
    void addTags(Card card, Set<Tag> tags) throws DuplicateEdgeException;
}
These three APIs are sufficient for Flashy’s design requirements as of
version 1.5. While the choice of APIs require some logic to be placed
in the commands (such as AddCardCommand and EditCardCommand), they
are reusable and their implementations can be easily changed.
The sequence diagrams for addTags and removeTags are shown in Figure 15
and [fig::removeTags] respectively. In particular, it is important to note that:
-
During an
addTagsoperation,-
The tags will be created if they do not exist
-
DuplicateEdgeExceptionis thrown when the flashcard is already associated with the tag
-
-
During a
removeTagsoperation,-
TagNotFoundExceptionis thrown when the tag is not found in the card bank -
EdgeNotFoundExceptionis thrown when the flashcard and tag are not associated
-
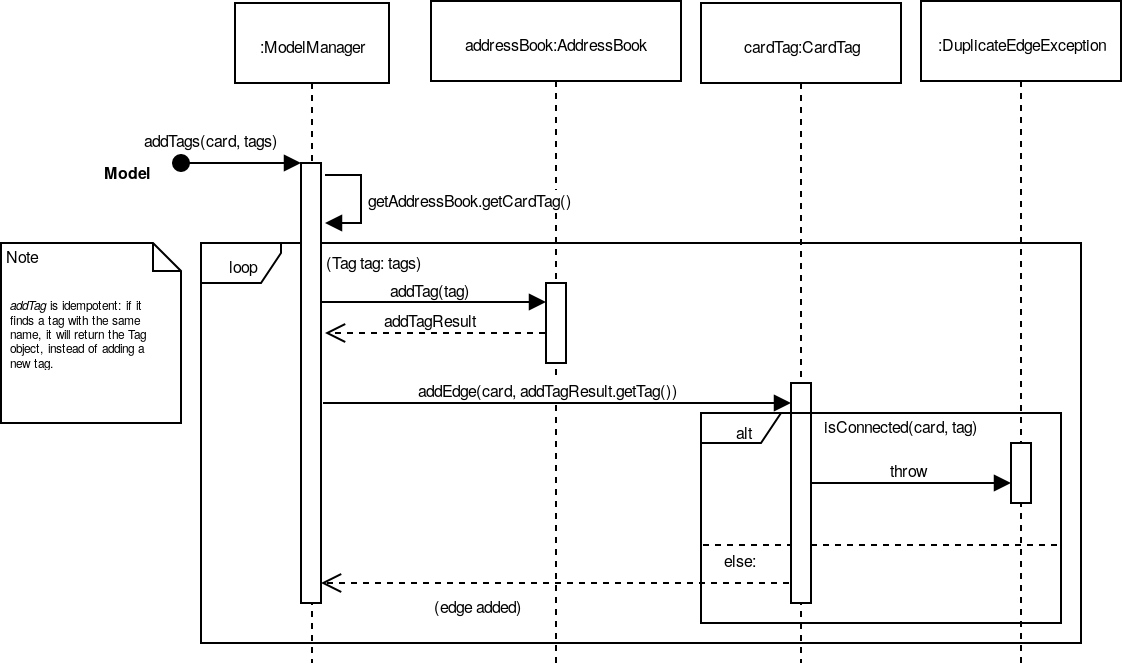
addTags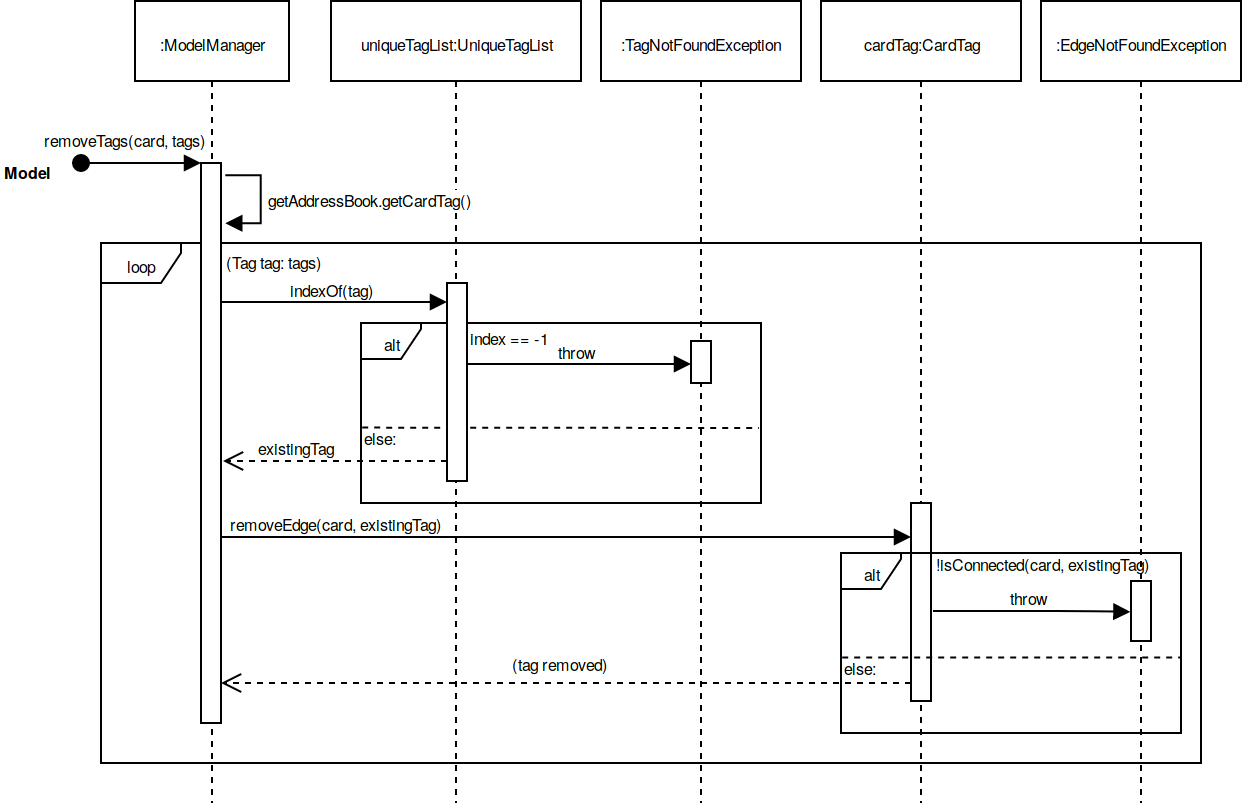
removeTags3.6.4. Design Considerations
Aspect: Storage of Edges
The edges should be persisted in storage. Hence, the CardTag
association class must be serializable to xml. This limits the
design choices for CardTag.
-
Alternative 1 (current choice): Add UUIDs to Cards and Tags, and model edges as UUID pairs.
-
Pros: This allows the
CardTaginstance to be easily, and cheaply serialized to and fromxml. Reduces coupling between theCardandTagclass. -
Cons: Requires the addition of a UUID field to the
CardandTagclass. Developer needs to be careful with implementation, because UUID strings forCardandTagare indistinguishable. The additional code complexity is a result of storage being through serialization and deserialization of xml, and should be greatly reduced if a proper relational database and Object-Relational Mapping (ORM) tool were used (planned in v2.0).
-
-
Alternative 2: Store the edge information in
CardandTag.-
Pros: No need for additional UUID field. Lower estimated code complexity.
-
Cons: Strong coupling between the
CardandTagclass. Requires heavy duplication of content in storage. The developer will also have to be careful with the implementation: editing an object would require changes in both theCardobject andTagobject.
-
Aspect: Choice of Data Structure
The application requires the following two operations to be fast:
-
Getting all
Cardinstances from a specificTag(operation 1) -
Getting all
Taginstances from a specificCard(operation 2)
Adjacency lists provide much better performance — O(1) on both
operations, as compared to an adjacency matrix. In addition, a typical
CardTag graph is sparse, and adjacency lists are much more memory
efficient. Hence, the adjacency list is a natural choice.
-
Alternative 1 (current choice): Storing edges in 2
HashMap`s: `cardMapandtagMap.-
Pros:
O(1)for both operations. -
Cons: Double the memory requirements.
-
-
Alternative 2: Storing edges in 1
HashMap:cardMaportagMap.-
Pros: Uses minimal amount of memory.
-
Cons:
O(1)only for one operation.
-
3.7. Scheduling, Answering and Showdue
The core component of how spaced repetition works is that it keep tracks of how good the user is with a certain card. Our scheduling algorithm is an implementation of the well known SM2 algorithm used by Supermemo, another flashcard app.
The main idea of how this is done is to keep a score of how good a user is with a certain card, a Schedule class is created.
Each card has its own Schedule object. There are some functions to allow the user to update
the score of the card after each time the user has answered it.
There are many possible ways how this could have been implemented. However this document will try to walk you through the most difficult parts and talk about some note worthy mentions.
The Schedule object in each card is different from the ScheduleCommand
|
To interface with this Schedule object, answer, schedule and showdue command has been added.
-
answer-
Answers the card and update a score
-
This also set date for future review.
-
-
schedule-
Allows one to manually set review date
-
-
showdue-
Show cards due by a certain date to allow for effective studying.
-
3.7.1. Spaced Repetition Implementation
Schedule is implemented as an object in a Card.
Schedule contains a java.time.LocalDateTime which can be used to filter and order the cards.
showdue uses LocalDateTime to filter out and sort cards that are due by a certain date.
The feedbackRouterHandler(int confidenceLevel) function is the main part making the whole Scheduler system work.
feedbackRouterHandler(int confidenceLevel) will take in a confidence level 0, 1 or 2. 0 meaning worse, 2 meaning best.
-
0 move to back of queue, does not update internal score.
-
1 move to back of queue, updates internal score as a failure.
-
2 remove from queue, updates internal score as a success.
This will allow Schedule to gauge a user’s familiarity with a card and schedule review times appropriately.
How Schedule approximate forgetting curve
This part will go into the specifics of what a score means and how it is calculated. This class has some math and many variables, here is a short reference for their meaning if they are not self evident.
-
lowerBoundRememberRatedefault = 0.85. The percent of information we want users to retain. -
learningPhasedefault = 3. The number of days we denote as a learning phase. -
lastIntervaldefault = 1. The last interval given to schedule a review. -
easingFactordefault = 1.3. How easy is it for the user to remember a fact, the larger this number the easier it is. -
historicalEasingFactorthe cumulative form ofeasingFactor
Here is a simple summary of what is happening internally.
\(newEasingFactor = historicalEasingFactor * \frac{\log{(lowerBoundRememberRate)}}{\log{(successRate)}}\)
Initially when the user first creates a card, we give then a grace period with learningPhase. During this period we do not want to penalise the user for mistakes as this is a grace period for the user to pick up new cards. Penalising would be irritating and might demotivate learning.
Any feedback within this period will not update the easingFactor, feedback will only update after the learning phase.
The newEasingFactor is dependent on \(\log{(successRate)}\).
Suppose we want the user to retain 85% of the information learnt.
We set the lowerBoundRememberRate to 0.85.
If successRate < lowerBoundRememberRate newEasingFactor will reduce and card will be scheduled more frequently.
If the interval is too long, users might forget cards. Thus lowering the easingFactor and intervals will reduce.
A predicate filter is used in conjunction with Schedule class to retrieve a list of cards due for review.
3.7.2. Answer
Logic
AnswerCommand and AnswerCommandParser has a similar logic implementation to most commands.
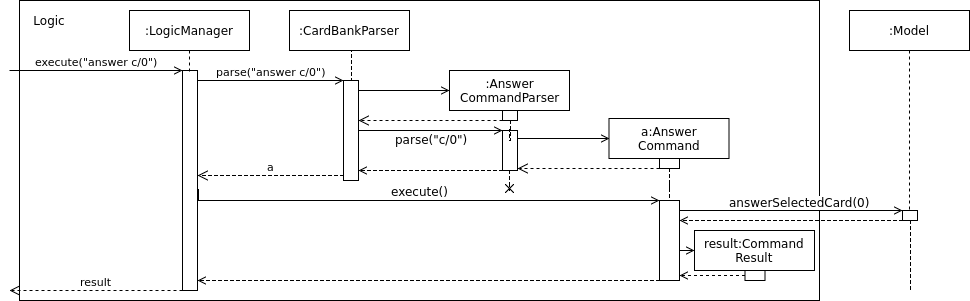
answer c/0.3.7.3. Date parser for showdue and schedule
We presume that users would often want to review lists of flashcards, thus these are very frequently typed. It would be very irritating if users had to constantly key in showdue d/14 m/4 y/2018 when its obviously just today’s date. Thus we designed these commands to be more intelligence and less strict about its input parameters.
Whichever field d/ m/ y/ are not present, it will be assumed to be today’s day, month or year.
So doing showdue without any parameters will just return cards due by today.
Initially any typos or errors made would just assume users would like to get cards due by today.
However some users find this flexibility to be a bug, now we strictly enforce that showdue must be empty to return today’s cards.
|
Although only showdue is talked about. This is actually a generic date parser. schedule command uses the same thing.
|
3.8. Polymorphic flashcards
3.8.1. Current Implementation
Allowing different types of cards is essential to Flashy. This enables the user to add and edit a normal, MCQ or fill-in-the-blanks flashcard so that the user can learn more efficiently, and use whichever that suits his learning style.
New classes McqCard and FillBlanks were created to implement this enhancement, and they inherit the Card class, as shown in Figure 11.
McqCard and FillBlanksCard from the Card class
Card, McqCard and FillBlanksCard.3.8.3. Aspect: Implementation of polymorphic flashcards
-
Alternative 1 (current choice): Have a class each for MCQ and fill blanks type flashcards and let them inherit the
Cardclass.
MCQ flashcards have the constraint that the back of the card should be an integer between 1 and the number of options available.
For fill blanks flashcards, the constraint is that the number of answers should be the same as the number of blanks.-
Pros: In terms of usability, having constraints allows users to input the right arguments for different cards.
-
Cons: Additional classes have to be implemented.
-
-
Alternative 2: Just use a single
Cardclass for all cards, so no constaints are set.-
Pros: No additional classes have to be implemented. Let the user add flashcards with any arguments.
-
Cons: No constraints for the flashcards.
-
3.9. Adding and editing of polymorphic flashcards
3.9.1. Current implementation
The addc command is used to add all types of flashcards.
3.9.2. Design Considerations
Aspect: Implementation of add command for MCQ and fill blanks type flashcards.
-
Alternative 1 (current choice): Use
addcfor the adding of MCQ and fill blanks type flashcards.-
Pros: There would be less commands to keep track of and combining the command reduces repeated codes since there are similarities between adding of normal and other type cards.
One example of similarity is shown in the code snippet forseedu.flashy.logic.commands.AddCardCommand: executeUndoableCommand()below. -
Cons: The add card command has to be changed which can result in undesired consequences if mistakes were made. Care has to be taken when implementing the add card feature for MCQ and fill blanks flashcards as both have constraints which cannot be violated.
Thus the constraints have to be checked before allowing the flashcard is added, as shown in the code snippet forseedu.flashy.logic.commands.AddCardCommandParser: parse()
-
    public CommandResult executeUndoableCommand() throws CommandException {
            requireNonNull(model);

            try {
                model.addCard(cardToAdd);
            }
            // ... Catch exception ...

            if (tagsToAdd.isPresent()) {
                Set<Tag> tags = tagsToAdd.get();
                try {
                    model.addTags(cardToAdd, tags);
                }
                // ... Catch exception ...
            }

            // ... Return result ...

        }
    public AddCardCommand parse(String args) {
        // ...

        try {
            // ... Parse arguments ...

            if (options.isEmpty()) {
                if (FillBlanksCard.containsBlanks(front)) {
                    card = ParserUtil.parseFillBlanksCard(front, back);
                } else {
                    card = new Card(front, back);
                }
            } else {
                for (String option: options) {
                    ParserUtil.parseMcqOption(option);
                }
                card = ParserUtil.parseMcqCard(front, back, options);
                card.setType(McqCard.TYPE);
            }

            return new AddCardCommand(card, tags);
        } catch (IllegalValueException ive) {
            throw new ParseException(ive.getMessage(), ive);
        }
}-
Alternative 2: Implement a different
addmandaddfcommand for adding of MCQ and fill blanks type flashcard respectively.-
Pros: No changes needs to be made to the
addccommand. Even ifaddmoraddffails,addccommand can still work. -
Cons: Less commands for developers to keep track of. It is also less efficient to have similar codes for different commands.
If there is a change in implementation, developers would have to change code for three separate commands, which is troublesome.
-
3.10. Storage of flashcards
3.10.1. Current Implementation
The current implementation saves the flashcard data in XML format and reads it back when the card bank is loaded.
A single XmlAdaptedCard class is used to convert the attributes of flashcards into XML Elements and XmlSerializableCardBank stores a list of XmlAdaptedCard.
3.10.2. Design Considerations
Aspect: Implementation of XmlAdaptedCard class
-
Alternative 1 (current choice): Implement a single
XmlAdaptedCardclass to convert all types of flashcards into XML format.-
Pros: Flashcards would be stored in the order in which they were added.
-
Cons:
XmlAdaptedCardhas to be tweaked to take in theoptionsattribute from theMcqCardclass, and thetoModelType()method has to check for the constraints of the MCQ and fill blanks flashcard as shown in the code snippets below:
Fromsrc.main.java.seedu.flashy.storage.XmlAdaptedCard
-
    public class XmlAdaptedCard {

        // ... Other attributes ...

        @XmlElement(required = true)
        private List<String> option = new ArrayList<>();

        // ... Constructors and methods ...
    }

    // ...

    public Card toModelType() throws IllegalValueException {
        // ... Check id, front, back constraints ...

        if (this.type.equals(FillBlanksCard.TYPE)) {
            if (!FillBlanksCard.isValidFillBlanksCard(this.front, this.back)) {
                // ... Catch exception ...
            }
            // ... Return card ...;
        }
        if (this.type.equals(McqCard.TYPE)) {
            if (!McqCard.isValidMcqCard(this.back, this.option)) {
                // ... Catch exception ...
            }
            // ... Return card ...
        }
        // ... Return card ...
     }
-
Alternative 2: Implementing a separate
XmlAdaptedMcqCardandXmlAdaptedFillBlanksCardto convert MCQ and fill blanks flashcards into XML format respectively.
Initially,XmlAdaptedMcqCardwas implemented to inheritXmlAdaptedCard. InXmlSerializableCardBank, there would be a separate list forXmlAdaptedMcqCard, as shown in the code snippet below (which was implemented initially but later removed from source code):
    public class XmlSerializableCardBank {
        // ... Other attributes ...

        @XmlElement
        private List<XmlAdaptedCard> cards;

        // New list for XmlAdaptedMcqCards
        @XmlElement
        private List<XmlAdaptedMcqCard> mcqCards;

        /**
         * Conversion
         */
        public XmlSerializableCardBank(ReadOnlyCardBank src) {
            // ...
            for (Card card: src.getCardList()) {
                if (card.getType().equals(McqCard.TYPE)) {
                    mcqCards.add(new XmlAdaptedMcqCard(...));
                } else {
                    cards.add(new XmlAdaptedCard(...));
                }
            }
        }
        // ...
    }
-
Pros: No need to tweak
XmlAdaptedCardand both classes would be separate, so mistakes inXmlAdaptedMcqCardwould not affect that inXmlAdaptedCard. There’s no need to check forMcqCardconstraints. -
Cons:
XmlAdaptedCardandXmlAdaptedMcqCardwould be stored in separate lists in XML format. When the card bank is loaded, both lists would be read separately and the order in which the cards were added would not be captured.
4. Documentation
We use asciidoc for writing documentation.
| We chose asciidoc over Markdown because asciidoc, although a bit more complex than Markdown, provides more flexibility in formatting. |
4.1. Editing Documentation
See UsingGradle.adoc to learn how to render .adoc files locally to preview the end result of your edits.
Alternatively, you can download the AsciiDoc plugin for IntelliJ, which allows you to preview the changes you have made to your .adoc files in real-time.
4.2. Publishing Documentation
See UsingTravis.adoc to learn how to deploy GitHub Pages using Travis.
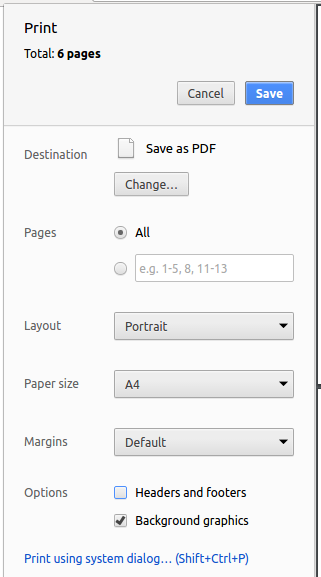
4.3. Converting Documentation to PDF format
We use Google Chrome for converting documentation to PDF format, as Chrome’s PDF engine preserves hyperlinks used in webpages.
Here are the steps to convert the project documentation files to PDF format.
-
Follow the instructions in UsingGradle.adoc to convert the AsciiDoc files in the
docs/directory to HTML format. -
Go to your generated HTML files in the
build/docsfolder, right click on them and selectOpen with→Google Chrome. -
Within Chrome, click on the
Printoption in Chrome’s menu. -
Set the destination to
Save as PDF, then clickSaveto save a copy of the file in PDF format. For best results, use the settings indicated in the screenshot below.
5. Testing
5.1. Running Tests
There are three ways to run tests.
| The most reliable way to run tests is the 3rd one. The first two methods might fail some GUI tests due to platform/resolution-specific idiosyncrasies. |
Method 1: Using IntelliJ JUnit test runner
-
To run all tests, right-click on the
src/test/javafolder and chooseRun 'All Tests' -
To run a subset of tests, you can right-click on a test package, test class, or a test and choose
Run 'ABC'
Method 2: Using Gradle
-
Open a console and run the command
gradlew clean allTests(Mac/Linux:./gradlew clean allTests)
| See UsingGradle.adoc for more info on how to run tests using Gradle. |
Method 3: Using Gradle (headless)
Thanks to the TestFX library we use, our GUI tests can be run in the headless mode. In the headless mode, GUI tests do not show up on the screen. That means the developer can do other things on the Computer while the tests are running.
To run tests in headless mode, open a console and run the command gradlew clean headless allTests (Mac/Linux: ./gradlew clean headless allTests)
5.2. Types of tests
We have two types of tests:
-
GUI Tests - These are tests involving the GUI. They include,
-
System Tests that test the entire App by simulating user actions on the GUI. These are in the
systemtestspackage. -
Unit tests that test the individual components. These are in
seedu.flashy.uipackage.
-
-
Non-GUI Tests - These are tests not involving the GUI. They include,
-
Unit tests targeting the lowest level methods/classes.
e.g.seedu.flashy.commons.StringUtilTest -
Integration tests that are checking the integration of multiple code units (those code units are assumed to be working).
e.g.seedu.flashy.storage.StorageManagerTest -
Hybrids of unit and integration tests. These test are checking multiple code units as well as how the are connected together.
e.g.seedu.flashy.logic.LogicManagerTest
-
5.3. Troubleshooting Testing
Problem: HelpWindowTest fails with a NullPointerException.
-
Reason: One of its dependencies,
UserGuide.htmlinsrc/main/resources/docsis missing. -
Solution: Execute Gradle task
processResources.
6. Dev Ops
6.1. Build Automation
See UsingGradle.adoc to learn how to use Gradle for build automation.
6.2. Continuous Integration
We use Travis CI and AppVeyor to perform Continuous Integration on our projects. See UsingTravis.adoc and UsingAppVeyor.adoc for more details.
6.3. Coverage Reporting
We use Coveralls to track the code coverage of our projects. See UsingCoveralls.adoc for more details.
6.4. Documentation Previews
When a pull request has changes to asciidoc files, you can use Netlify to see a preview of how the HTML version of those asciidoc files will look like when the pull request is merged. See UsingNetlify.adoc for more details.
6.5. Making a Release
Here are the steps to create a new release.
-
Update the version number in
MainApp.java. -
Generate a JAR file using Gradle.
-
Tag the repo with the version number. e.g.
v0.1 -
Create a new release using GitHub and upload the JAR file you created.
6.6. Managing Dependencies
A project often depends on third-party libraries. For example, Flashy depends on the Jackson library for XML parsing. Managing these dependencies can be automated using Gradle. For example, Gradle can download the dependencies automatically, which is better than these alternatives.
a. Include those libraries in the repo (this bloats the repo size)
b. Require developers to download those libraries manually (this creates extra work for developers)
Appendix A: Product Scope
Target user profile: * has the need for flashcards * has a significant amount of material to memorise * have vast amount of different subjects to schedule
Value proposition: helps user memorise facts better.
Appendix B: Product Scope
Target user profile: * has the need for flashcards * has a significant amount of material to memorise * have vast amount of different subjects to schedule
Value proposition: helps user memorise facts better.
Appendix C: Feature Contribution
C.1. Jethro Kuan
Major enhancement: Implementing a graph structure to link Cards and Tags so that users are able to tag different cards in order to search them efficiently.
Minor enhancement: Implementing a list card command so that users would be able to list the cards available for reference
C.2. Foo Yong Jie
Major enhancement: Improving the UI / UX of the application. This includes:
-
Changing to a green colour scheme to signify growth, efficiency, and focus.
-
Implementing a 3-panel layout to display more information to the user.
-
Adding an autocompletion engine to help users enter commands quickly.
-
Adding the ability to change themes in Flashy to further improve the customisability of the application.
Minor enhancement: Implementing the autosaving of theme preferences to maintain a hassle-free experience.
C.3. Wong Ding Feng
Major enhancement: Implementing a scheduler to prompt users which card they should review daily so that they are able to prioritise what to go through first.
Minor enhancement: Sorting of cards based on tags.
C.4. Shawn Chua
Major enhancement: Implementing polymorphic flashcards to include MCQ-type and fill-in-the-blanks-type flashcards so that users are able to memorise information in different ways.
Minor enhancement: Implementing editing of existing cards so that users are able to make changes should they make a mistake.
Appendix D: User Stories
Priorities: High (must have) - * * *, Medium (nice to have) - * *, Low (unlikely to have) - *
| Priority | As a … | I want to … | So that I can… |
|---|---|---|---|
|
University Student |
Create a new card |
I can review new material |
|
University Student |
Clone an existing card |
I can reuse the template for new content |
|
University Student |
Edit the content an existing card |
I can update the card content with new material from the latest I can lecture |
|
University Student |
Archive an existing card |
I can look at unused cards in the future |
|
University Student |
Add a new tag |
I can create review packs for specific subjects and exams |
|
University Student |
Rename an existing tag |
I can correct my mistake in tag creation |
|
University Student |
Delete an existing tag |
I free up clutter on my dashboard |
|
University Student |
Tag cards according to subjects |
Search for cards related to a subject easily |
|
University Student |
Edit existing cards |
Make changes should i make a mistake |
|
University Student |
Get automatic prompts of when to study what |
I can get memorise optimally |
|
University Student |
Search for card sets by multiple tags |
Find relevant cards better |
|
University Student |
See a dashboard |
Have an overview of my progress |
|
University Student |
Fuzzy search to get cards spanning across different tags |
Create new sets to learn from |
|
University Student |
Delete an existing card |
I can save space on my PC |
|
University Student |
Easily find what I want |
I can do things without memorising commands |
|
University Student |
Create different flash card templates |
I have some guiding options |
|
University Student |
Tag cards according to urgency |
Prioritise which cards to review first |
|
University Student |
Reorder and reschedule cards |
React to new changes to time table |
|
University Student |
View more information about different available commands |
I can learn how to use various commands |
|
University Student |
Export my cards |
To share with others |
|
University Student |
Export by tag |
To share my card set with others |
|
University Student |
Import cards |
To learn from others |
|
University Student |
Layout my content properly |
I can understand my cards |
|
University Student |
Log my progress |
Be happy that I’m doing work |
Appendix E: Use Cases
(For all use cases below, the System is the CardBank and the Actor is the user, unless specified otherwise)
Use case: Add a flashcard
MSS
-
User adds a flashcard with an associated tag
-
CardBank adds the new flashcard
Use case ends.
Extensions
-
1a. The given parameters are invalid.
Use case ends.
Use case: Edit flashcard
MSS
-
User requests to filter flashcards associated with a certain tag
-
CardBank shows a list of flashcards
-
User requests to edit a specific flashcard in the list
-
CardBank edits the flashcard
Use case ends.
Extensions
-
2a. The list is empty.
Use case ends.
-
3a. The given index or parameters supplied are invalid.
-
3a1. CardBank shows an error message.
Use case resumes at step 2.
-
Use case: Edit tag
MSS
-
User requests to view the list of tags
-
CardBank shows a list of tags
-
User requests to edit a specific tag in the list
-
CardBank edits the tag
Use case ends.
Extensions
-
2a. The list is empty.
Use case ends.
-
3a. The given index or parameters supplied are invalid.
-
3a1. CardBank shows an error message.
Use case resumes at step 2.
-
Use case: Delete flashcard
MSS
-
User requests to filter flashcards associated with a certain tag
-
CardBank shows a list of flashcards
-
User requests to delete a specific flashcard in the list
-
CardBank deletes the flashcard
Use case ends.
Extensions
-
2a. The list is empty.
Use case ends.
-
3a. The given index is invalid.
-
3a1. CardBank shows an error message.
Use case resumes at step 2.
-
Use case: View back of flashcard
MSS
-
User requests to filter flashcards associated with a certain tag
-
CardBank shows a list of flashcards
-
User requests to view the back of a specific flashcard in the list
-
Application displays the back of the flashcard
Use case ends.
Extensions
-
2a. The list is empty.
Use case ends.
-
3a. The given index is invalid.
-
3a1. CardBank shows an error message.
Use case resumes at step 2.
-
Appendix F: Non Functional Requirements
-
Should work on any mainstream OS as long as it has Java
1.8.0_60or higher installed. -
Should be able to hold up to 1000 persons without a noticeable sluggishness in performance for typical usage.
-
A user with above average typing speed for regular English text (i.e. not code, not system admin commands) should be able to accomplish most of the tasks faster using commands than using the mouse.
-
Should be portable between different systems
{More to be added}
Appendix H: Instructions for Manual Testing
Given below are instructions to test the app manually.
| These instructions only provide a starting point for testers to work on; testers are expected to do more exploratory testing. |
H.1. Launch and Shutdown
-
Initial launch
-
Download the jar file and copy into an empty folder
-
Double-click the jar file
Expected: Shows the GUI with a set of sample contacts. The window size may not be optimum.
-
-
Saving window preferences
-
Resize the window to an optimum size. Move the window to a different location. Close the window.
-
Re-launch the app by double-clicking the jar file.
Expected: The most recent window size and location is retained.
-
{ more test cases … }
H.2. Deleting a person
-
Deleting a person while all persons are listed
-
Prerequisites: List all persons using the
listcommand. Multiple persons in the list. -
Test case:
delete 1
Expected: First contact is deleted from the list. Details of the deleted contact shown in the status message. Timestamp in the status bar is updated. -
Test case:
delete 0
Expected: No person is deleted. Error details shown in the status message. Status bar remains the same. -
Other incorrect delete commands to try:
delete,delete x(where x is larger than the list size) {give more}
Expected: Similar to previous.
-
{ more test cases … }
H.3. Saving data
-
Dealing with missing/corrupted data files
-
{explain how to simulate a missing/corrupted file and the expected behavior}
-
{ more test cases … }